• About
  • What is ZOE?
  • Other FAQs
  • Resources
  • _Longevity resources
Hello Healthspan

How to eat well to live longer.

Header Menu

  • Mains
  • Breads & Muffins
  • Snacks
  • Recipes
  • Vegan
  • Healthspan tips
Recipes
Showing posts with label Recipes. Show all posts
Mains Recipes

Carrot, tomato, chickpea, and feta bake

I rarely eat pasta (I have very poor blood sugar control) and eating carrots alone also spike my glucose. But the combination of ingredients in this big veggie and feta roast makes it possible to eat both and this mix is also great paired with barley, farrow, or my nutty seed bread. Heres how it scores in the ZOE app:


And here's what happens to the score when I add a high-protein pasta:
This isn't something I eat regularly because it leaves me feeling pretty heavy. But it's great to know that something so creamy and dense isn't completely terrible for me.

Chop up red onions, carrots, and baby tomatoes then throw them onto a well-oiled baking sheet together with a couple of blocks of feta cheese and a can of chickpeas. Add little blobs of minced garlic to some of the veggies then season everything with salt, pepper and Italian herbs if you like them.

Once the veggies are well baked (and the cheese is soft and creamy) throw it all into a large casserole dish or ceramic bowl with the freshly boiled pasta. Mix it well so that everything gets coated in the creamy feta cheese. Add extra seasoning and olive oil if necessary and serve with a wedge of lemon - the little splash of acid is delicious!

HOW TO ROASTED CARROT AND FETA BAKE


PREP TIME: 15 mins
COOK TIME: 30-40 mins
SERVINGS: 4

INGREDIENTS 

  • 2 blocks of feta cheese (depends on how cheesy you want the final combination)
  • 1 can of chickpeas, drained and rinsed
  • 4-5 medium carrots, chopped
  • 1 large red onion, sliced
  • 15 baby tomatoes
  • Minced garlic (either freshly minced or from a bottle)
  • Salt, pepper, and any seasoning you like (e.g. thyme, rosemary, mixed Italian herbs)

STEP BY STEP

- Preheat the oven to 400F, prep a large baking sheet for roasting (line with foil and get it nice and oily) and have a good size casserole dish ready to mix everything in once it's all cooked.
- Chop up red onions, carrots, and baby tomatoes then throw them onto the oiled baking sheet together with the blocks of feta cheese and a can of chickpeas. Add little blobs of minced garlic to some of the veggies then season everything with salt, pepper and any other seasoning you like.
- Roast the veggies for 30 to 40 minutes, turning half way through
- While the vegetables roast, boil the pasta (high protein pasta is ideal)
- Once the carrots are tender, remove the baking tray from the oven and transfer everything to the casserole dish. Drain pasta and throw it into the dish too then mix it in quickly, getting the melted feta cheese to coat everything. 
- Serve with lemon wedges and a side salad. 


Read more » →
Mains Recipes

Sardine salad: how to love these little fishies


I grew up eating "sardines on toast" - something I now understand isn't a common kid meal. Then again, I also ate marmite on toast, anchovy spread on toast, avo on toast, and, of course, baked beans on toast. What can I say? It was the 70s in the South Africa. Anyway, the way my mother turned a can of sardines into a favorite meal was to finely chop tomatoes and onions and then mix those into the sardines along with vinegar. It was DELICIOUS! This salad is really just me amping up the fiber in my mom's toast topping and calling it salad.

Unless you've been living under a rock, you've probably heard that these little fishies are crazy good for you. Here are just some of the health benefits of sardines:

  1. One can of sardines (approximately 3.75 oz.) provides 24.6 grams of protein. That's a big protein punch for a little can. Sardines are also rich in calcium (382 grams) and vitamin D. Full nutritional breakdown here. 
  2. Sardines are an excellent source of marine Omega-3 fatty acids (DHA and EPA), a major player in reducing the risk of heart disease. DHA and EPA are also anti-inflammatories, can improve depression, are great for your skin, and have been shown to improve cognitive function.
  3. Sardines are a great source of vitamins and minerals like B1, B3, and Phosphorus, and the antioxidant Selenium.
  4. A study has shown that another health benefit of adding sardines to your diet is a reduced risk of diabetes. Starting from 27% of participants classified as high-risk for type 2 diabetes, this number reduced to only 8% by the end of the study.

But. A lot of people really don't like sardines; I don't like them straight out of the can either! But I love them when onions and vinegar are involved, so perhaps this salad will help make them more palatable to you. 

And it's gets a great score from ZOE (read my whole ZOE story here):


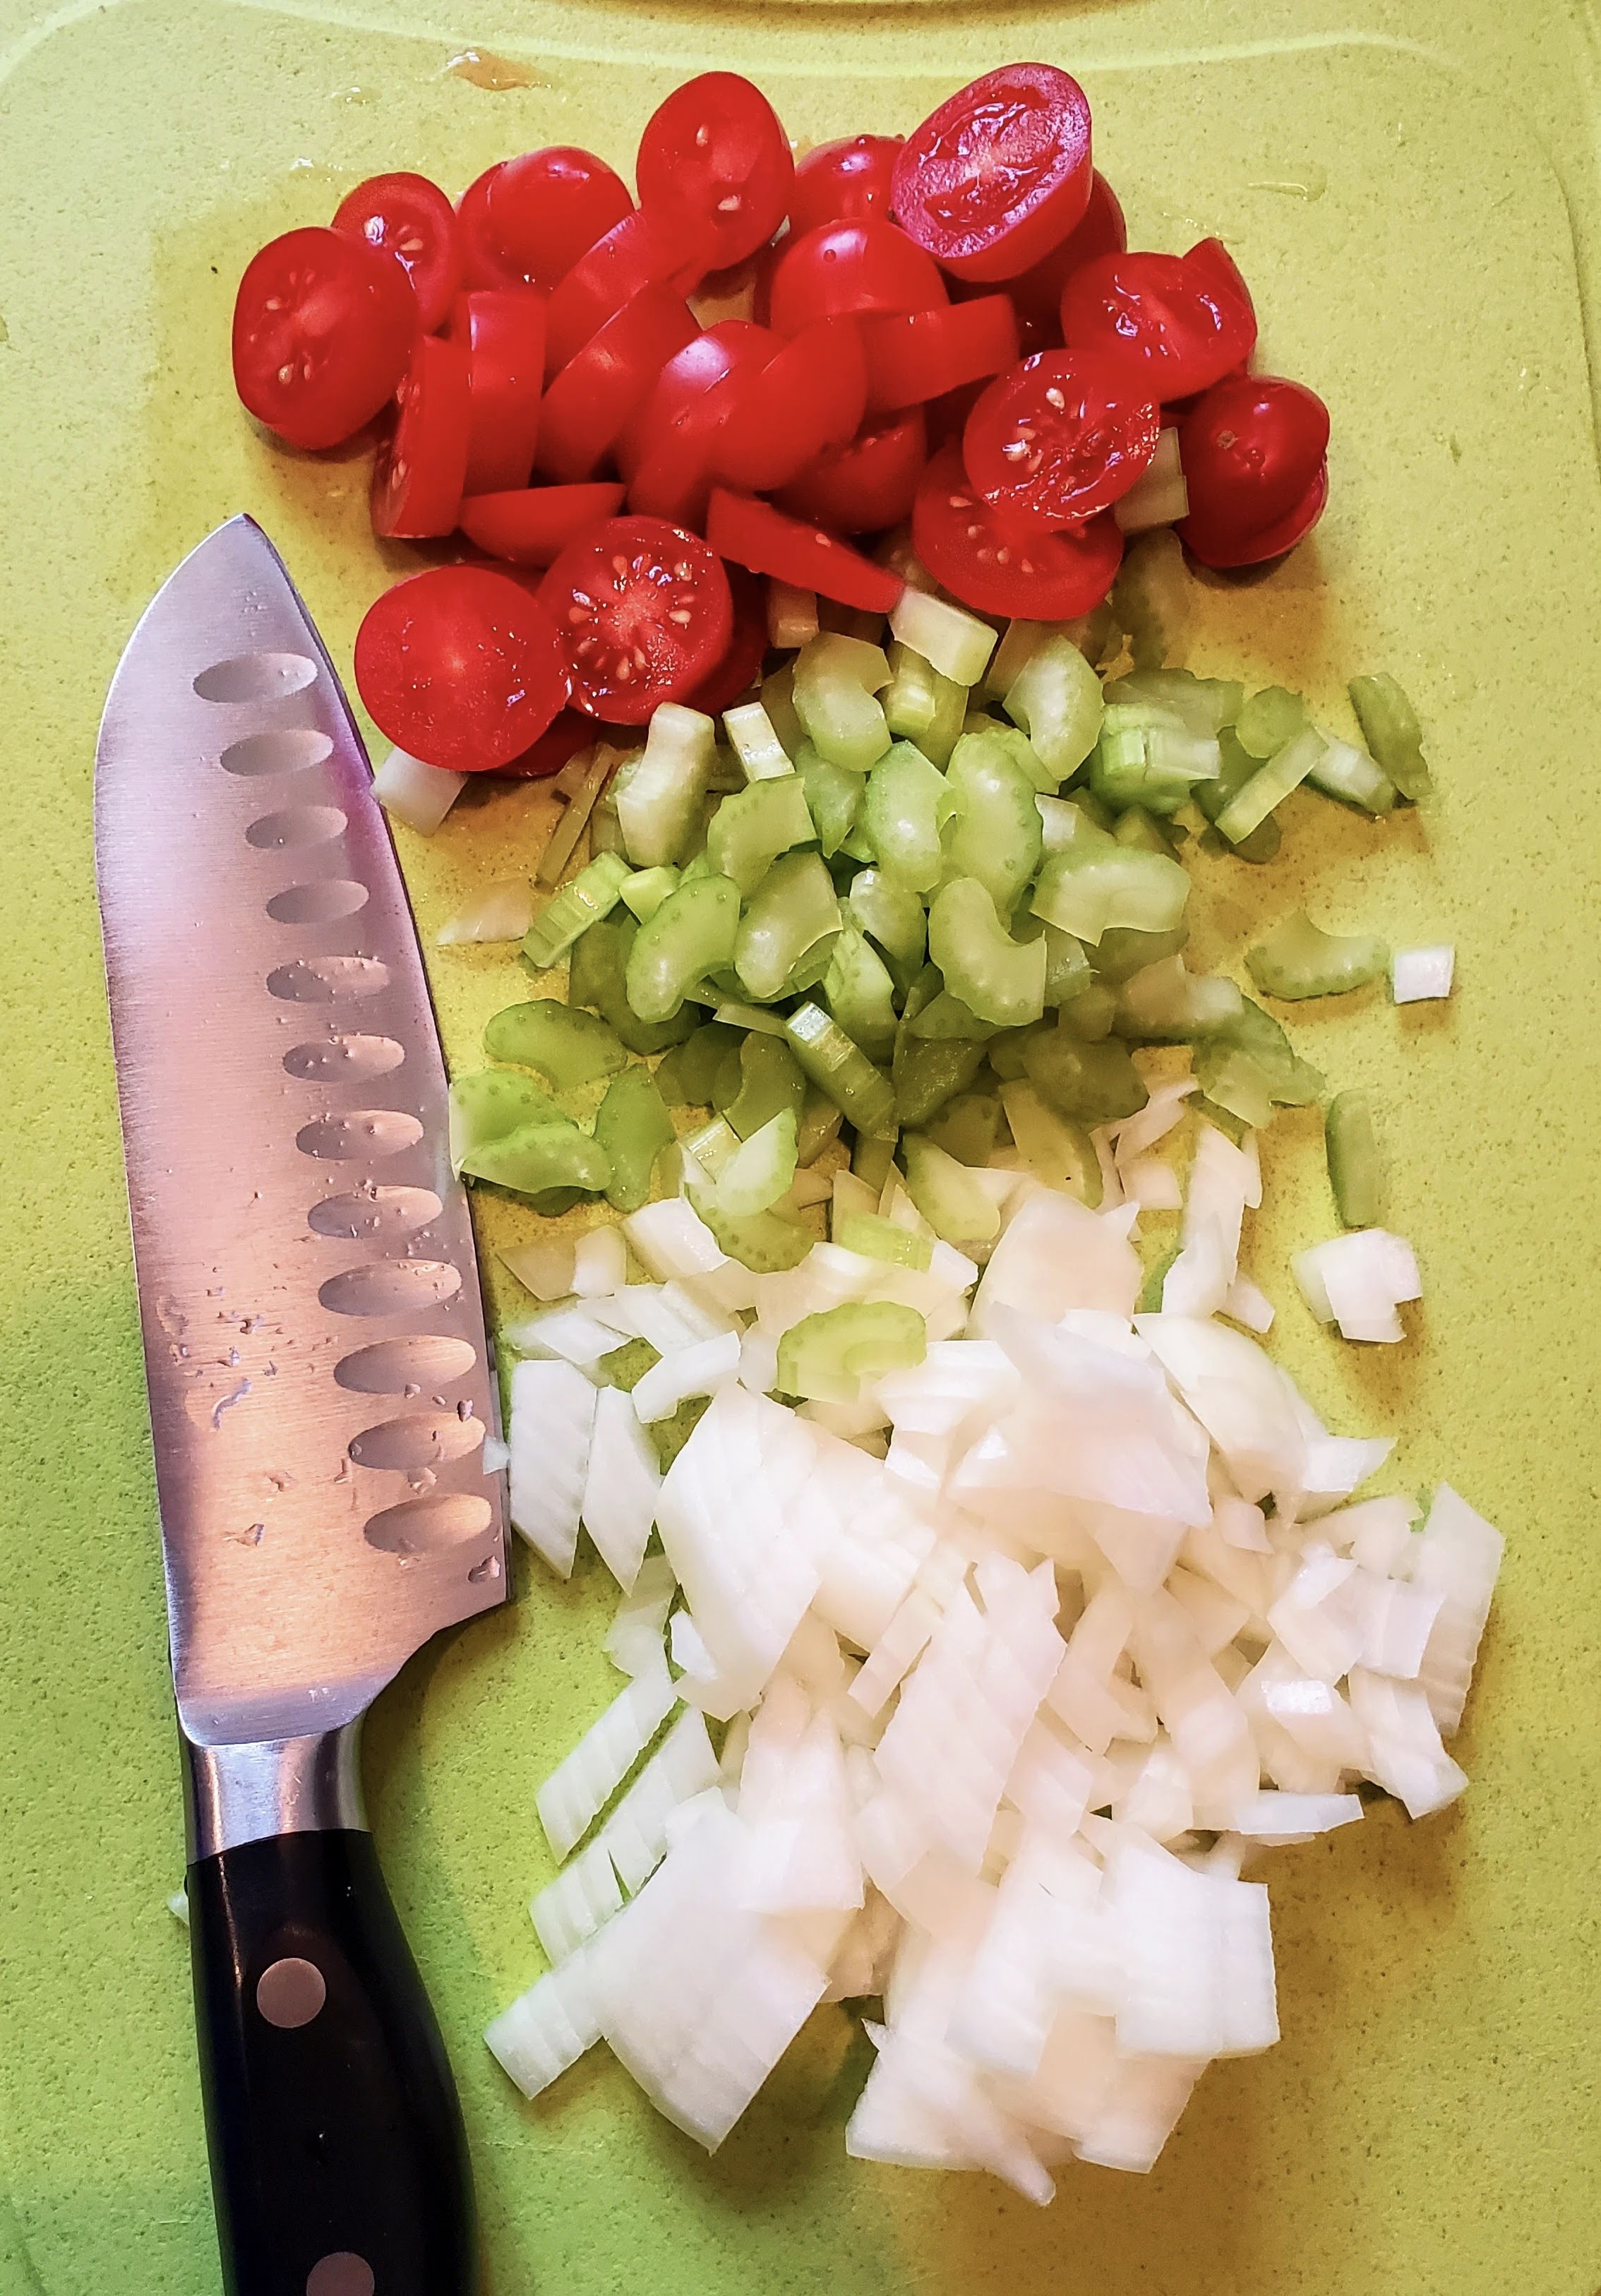
This salad is super quick to make - it really depends on how much chopping you want to do. Onions, tomatoes and celery are the primary ingredients.


These go into a bowl with the mashed sardines then you add vinegar and more olive oil (if you like). And that's really it. 

HOW TO MAKE SARDINE SALAD


PREP TIME: 10 mins
SERVINGS: 2

INGREDIENTS 

  • 2 cans of sardines
  • 1 rib of celery, minced
  • 1 small red/white onion or 3 green/spring onions (adjust this based on how much you like raw onion)
  • 6 grape tomatoes or one large tomato, chopped
  • Approx 1 tablespoon of vinegar (apple cider, white balsamic... whatever you like)
  • Extra olive oil to taste
  • 4+ cups of your favorite salad greens
  • Salt and black pepper to taste (and a bit of turmeric if you want to add more of an anti-inflammatory punch)

Other options depending on your mood and what's in the house
  • If you want to “spice up” the anti-inflammatory defense, add a little bit of turmeric and black pepper when you are preparing your sardines. The combination is critical: the piperine in black pepper inhibits your liver to make sure your body maximizes all the curcumin in the turmeric.
  • Chop up sun-dried tomatoes into the mix - they pair beautifully with sardines
  • If you like capers, you'll love them combined with sardines
  • Throw in 2 large springs of fresh basil, especially if you're adding sun-dried tomatoes
  • Make the whole thing *really* tomato-y by adding a tiny bit of tomato paste 
  • Raw garlic is always an option if you're a fan!

STEP BY STEP


- Use a fork to mash the sardines in a bowl. Add all the chopped veggies and stir. Then add vinegar, oil, salt, and pepper and combine well. If you can, get this 1-3 hours before you plan to eat it - this gives the onions time to mellow and the flavors time to mix. 

- Divide the greens between two plates and top each portion with sardine mix. If you're making this just for you, the other half will store well in the fridge for a few days. 


Read more » →
Breads & Muffins Recipes

Glucose-friendly carrot muffins

Besides the sugar-free blueberry muffins I bake regularly, there's nothing cake-like in my world because it's really not worth the havoc it wrecks on my body. But I can't pretend I don't miss cake. Especially carrot cake!
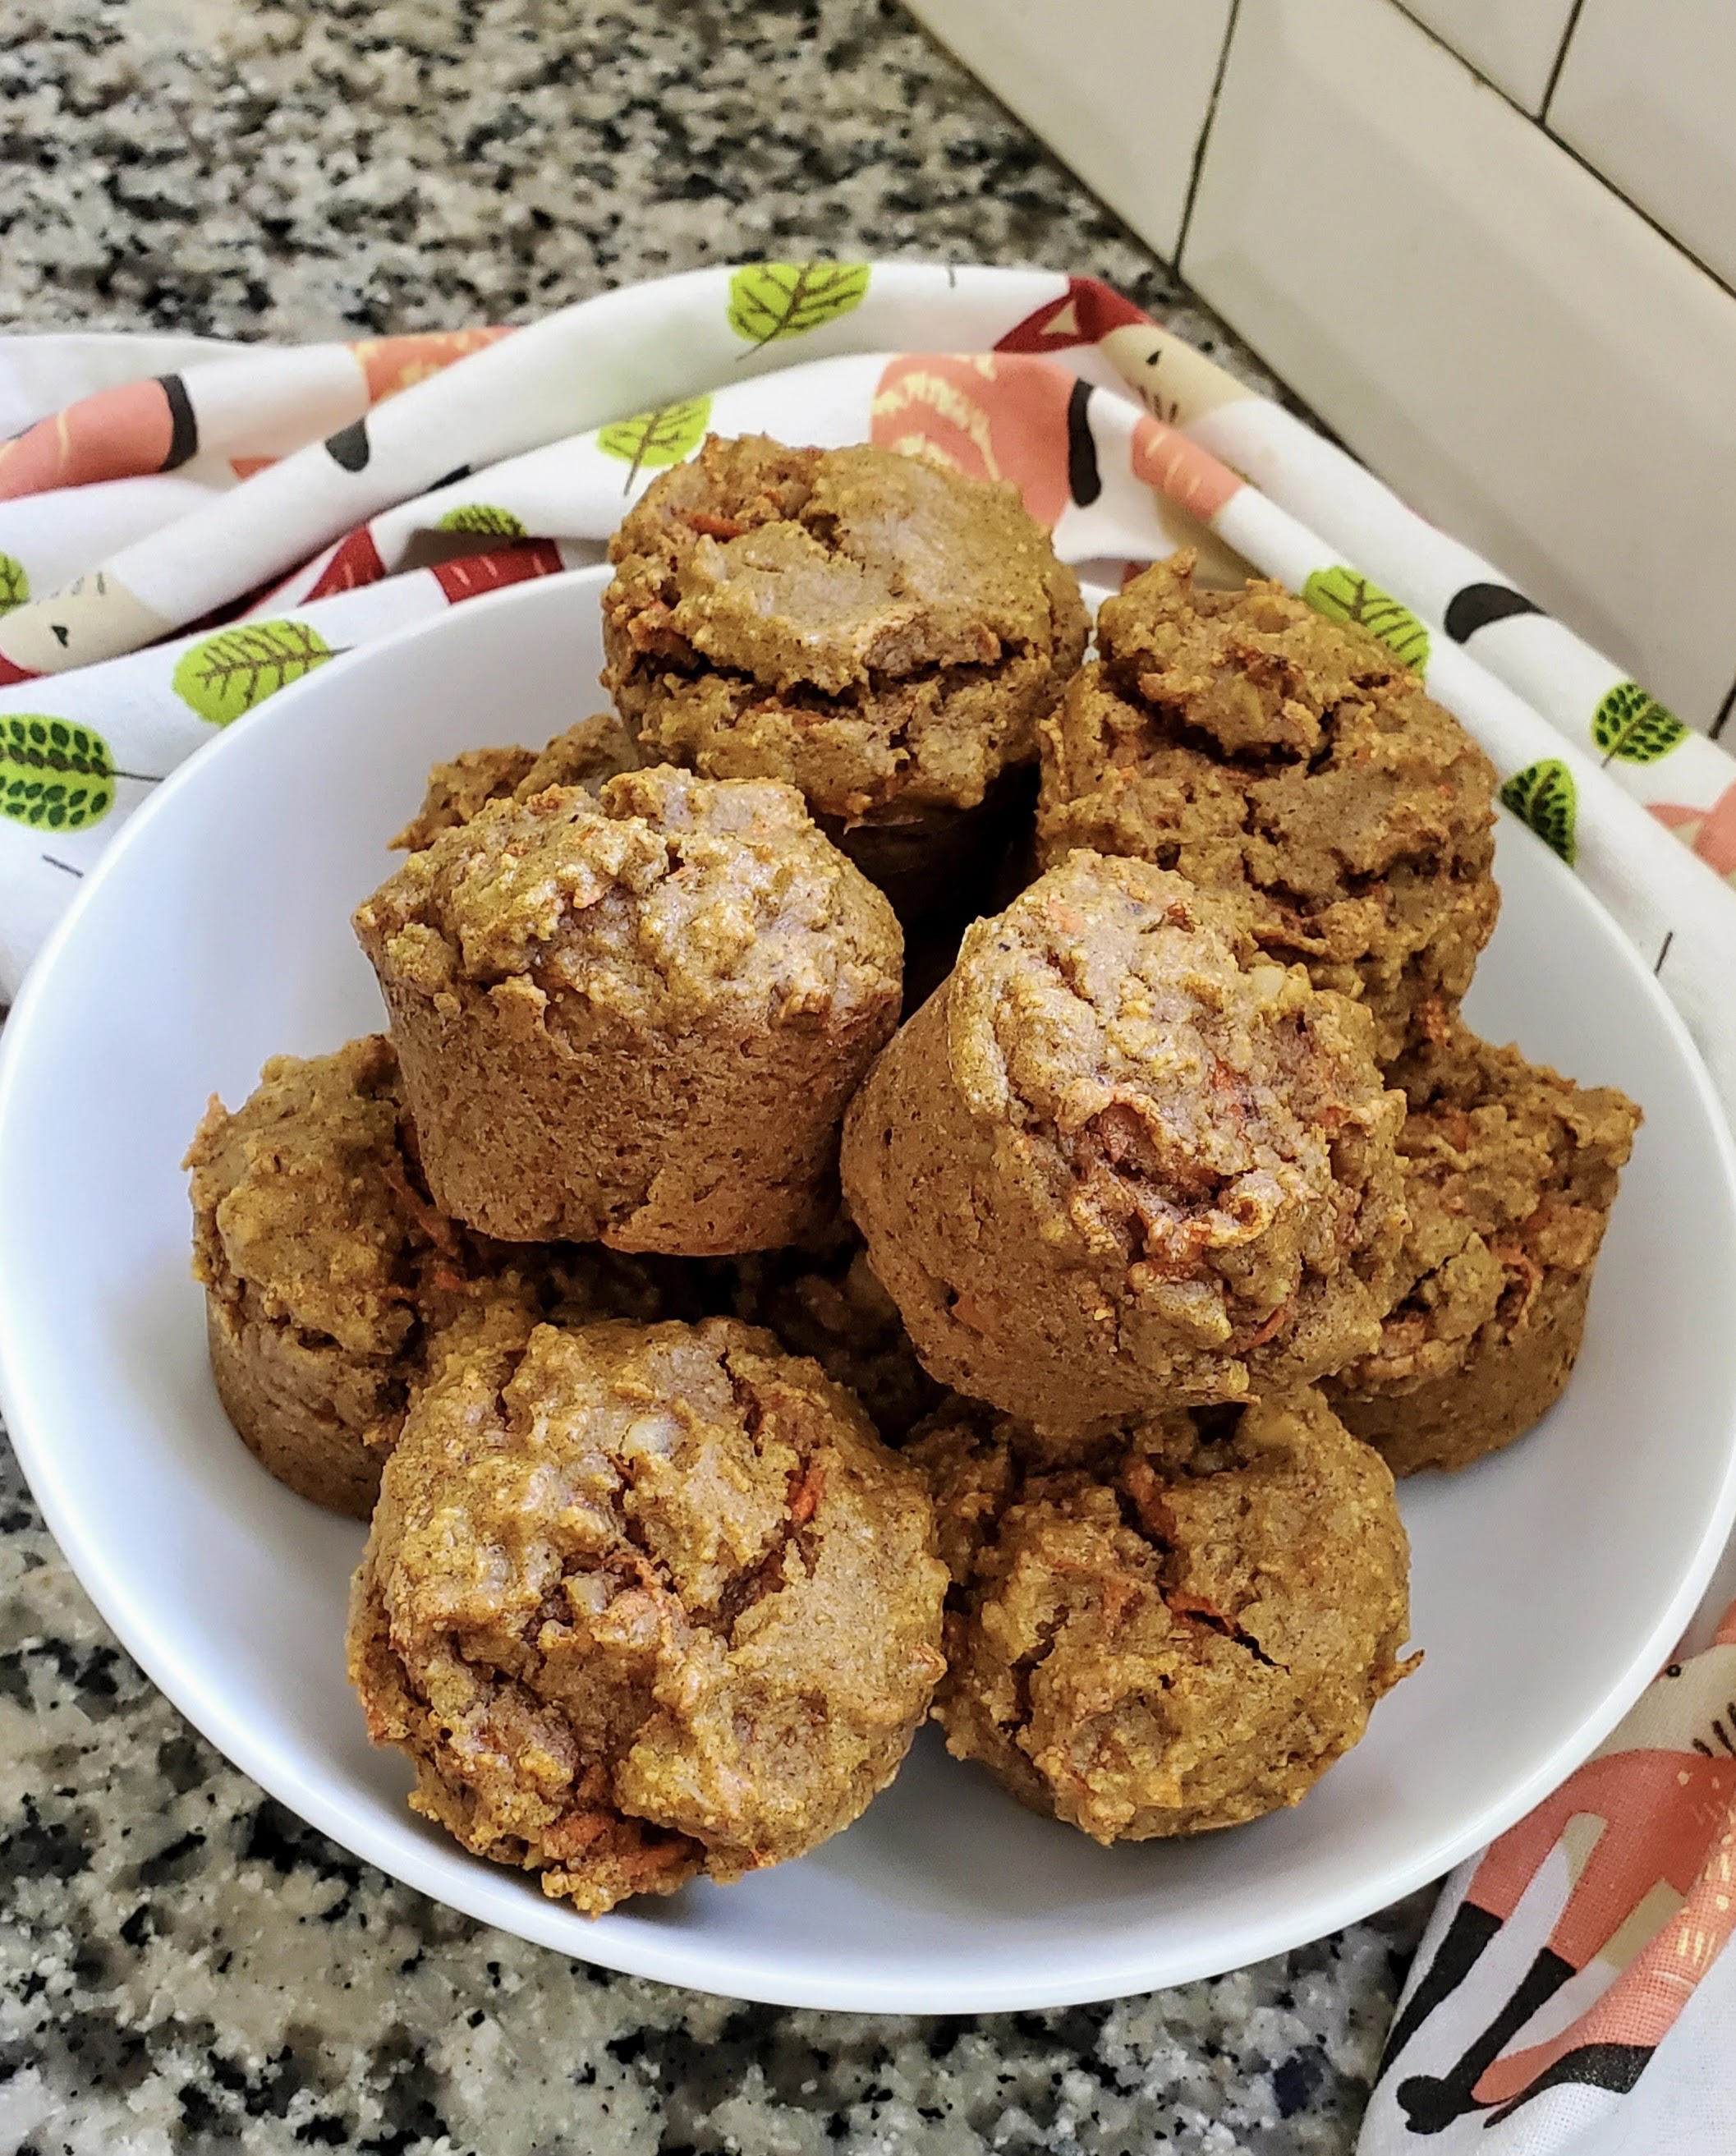
So when this amazing @sonjamk carrot cuffins recipe popped up via Levels, I paid attention. As I skimmed the ingredients, I was pretty sure it was going to be a winner, but checked it in the ZOE app to be sure and voila! These muffins get an 86 (my goal is to eat meals that get a score of 75 or higher).
Here's how these muffins score for me and I have very poor blood-glucose control (my story here). And yes, that's actual maple syrup in the recipe:

Called "Cuffins" in Sonja's original recipe (because they are cake-like) I had high hopes for these little things: I really wanted them to be carrot CAKE. And guess what? I think they are, even without icing. I'm going to give you the ingredients for Sonja's cashew icing/frosting below, but I can't handle cashews so I didn't bother with any frosting. 
What I did try was eating them with full-fat Greek yoghurt. Oh man... so good. And if you eat one of these muffins with just half a cup of Greek yogurt, you get yourself over 18 grams of protein into the bargain.   

Let's get into the recipe. 
You need a couple of mixing bowls and a standard 12-cup muffin/cupcake tray. 

Combine the dry ingredients in one bowl, the wet ingredients in another. Then grate the carrots and chop the walnuts (or whatever nuts you generally prefer in a carrot cake). 
Add the carrots and walnuts to the wet ingredients then slowly add the dry ingredients to the wet ingredients and stir until well combined. 

The muffin cups should be close to full, then pop them in the oven for about 20 mins. 

They're done when they're golden and a toothpick inserted into the middle of a muffin comes out clean. 
Pop them out onto a cooling tray for at least 10 mins before serving. 
These muffins can be stored in the freezer for up to 6 months so do yourself a favor and bake a double batch! 

HOW TO MAKE GLUCOSE-FRIENDLY CARROT MUFFINS


PREP TIME: 15 mins
COOK TIME: 20 mins
SERVINGS: 12

INGREDIENTS 

  • 2 cups of almond flour 
  • 1/2 teaspoon baking soda
  • 1 tablespoon ground cinnamon
  • 1 teaspoon nutmeg
  • 1 teaspoon salt
  • 3 eggs (I haven't tried a vegan substitute but I bet it would work fine)
  • 1/4 cup of olive oil
  • 2 tablespoons of almond butter
  • 2 tablespoons of maple syrup
  • 1 tablespoon pure vanilla extract
  • 1 and a half cups of shredded carrots
  • 1/2 a cup of chopped walnuts (or whatever nut you prefer)
  • Optional: 1 scoop of vanilla protein powder

Cashew cream frosting (optional)
  • 2 cups of raw cashews, soaked 
  • 3/4 cup unsweetened coconut cream OR cream cheese
  • 2 tablespoon lemon juice
  • 1 tablespoon vanilla extract
  • 1 tablespoon maple syrup
  • 1/8 teaspoon sea salt

STEP BY STEP


- Preheat the oven to 350F. Prepare a 12-cup nonstick/silicon pan with either olive oil or baking spray. Or use silicon cupcake liners.

- Mix dry ingredients (almond flour → salt) in one bowl and wet ingredients (eggs → vanilla) in another larger bowl. Stir each well.

- Add the grated carrots and chopped walnuts to the wet ingredients.

- Slowly add the dry ingredients into the wet ingredient bowl and stir until well combined.

- Divide batter evenly among the 12 cups - each cup should be full. 

- Bake for ~20 minutes. Check before you take them out of the oven; temperatures may vary by oven and you want the center to be moist but not jiggly.

- Let the muffins cool on a wire rack for 10 mins before serving. Leftover muffins can be stored in the fridge for up to 2 days and in the freezer for up to 6 months.

How to make Cashew Creme frosting: 

- A key step is soaking the cashews for 4 hours or for a quick option, in boiling water for 20 minutes. 

- Then, in a high-speed blender or food processor, blend all the ingredients together until thick and creamy. 

Remember to let the carrot muffins fully cool before adding the frosting, otherwise the frosting will slide off. 

Read more » →
Mains Recipes

How to eat pasta when your blood glucose control is poor


If, like me, you have poor blood glucose control (my story here) then sitting down to a big bowl of pasta is not on the cards. Even grain-free pasta (made from legumes etc) is going to spike your glucose, despite getting a decent score from ZOE: 


But sometimes, you just want pasta! And for me, it's really just a vehicle for pesto - I LOVE good pesto. So what can you do to combine foods in a way that gives you a yummy, satisfying pasta-like experience but doesn't put your body under horrible, damaging stress? Start with a pasta that gets a decent score, like Chickapea (score above). 

There are lots of other brands of dried noodles made from only legumes but I like the consistency of cooked Chickapea more than the others. 
(Disclosure: Some of the links on this page are affiliate links. This means that, at zero cost to you, I will earn an affiliate commission if you click through the link and finalize a purchase.)

Now add the ingredients that will flatten the glucose spike you'd otherwise get from this meal. Start by adding a tablespoon of pesto while the pasta is still warm. Then throw in:  
- 2 tablespoons of black olives (most important because fibre AND good fat)
- half a cup of broccoli
- 2 tablespoons of extra virgin olive oil
- handful of cherry tomatoes
- handful of arugula
Grate some extra parmesan on top too if you like! Here's what happens to the score: 


And that's how to have your pasta and eat it too. Or something. 

PS: If you really want to, you can create exactly the same bowl with regular pasta and still get a score of 81. But you'd be depleting the nutritional value of the dish; legume-based noodles serve up a good amount of protein. 

Pro tip from The Glucose Goddess

If you're going to go for the full pasta experience, try a Glucose Goddess hack: add a tablespoon of vinegar (any vinegar other than a syrupy balsamic) to a big glass of water and drink that before your meal. The acetic acid in the vinegar will reduce the impact of the meal on your blood glucose by up to 30%. THIRTY PERCENT! 


Read more » →
Mains Recipes Vegan

Powerfood salads and the best way to eat them


I know what you're thinking: there's some "best" way to eat a salad? The answer is YES. First of all, let's talk about powerfoods. 

What are powerfoods?

Disclosure: Some of the links on this page are affiliate links. This means that, at zero cost to you, I will earn an affiliate commission if you click through the link and finalize a purchase.

I'm going to mention them regularly because they tend to be plants and a tummy full of plants is a happy tummy. And any ZOE member is challenged to hit a plant goal every day! Why? First, plants are your best go-to for fiber and fiber promotes a healthy gut microbiome. It promotes regular bowel movements too, obvi, but the contribution it makes to boosting the good bugs in your gut is relatively new news. And it's all about the power of phytochemicals. If you want all the science, go here, or pick up Fiber Fueled, or listen to this edition of the ZOE Science and Nutrition podcast. 

The other amazing thing that makes plants so powerful? They provide an extraordinary nutritional bang per ounce. And the less time that passes between picking them and eating them, the more power they can share. This means you should think seriously about growing a few of your own edible leaves, sprouts, or microgreens. And when you shop at the farmer's market, plan on eating lots of that produce the same day you buy it! Your body will thank you.

What's makes this salad powerful? 

When we think about superfoods, things like broccoli and blueberries come to mind, not salad greens. But I'm here to tell you, EAT YOUR LEAVES. As I go through what makes such "basic" salad ingredients so special, I'm leaning on two books: Life Changing Foods and Power Foods. 

Let's start with all the different leaves: spring mix and arugula (from the grocery store), a few kale leaves from my hydroponic garden (see below), and a handful of microgreens. These are often thought of as nothing more than the boring base of a salad, but they're actually vegetable royalty! Leafy greens are practically predigested so they don't require much from your digestive system and they immediately get to work scrubbing and massaging your stomach lining, small intestine and colon, loosening old trapped yeast, mold, and other types of fungus and pockets of waste matter. If eating lettuce upsets you, start with small quantities of butter leaf or red leaf lettuce until you build up a tolerance. Leafy greens also help create a more alkaline stomach composition and general alkalinity in other body systems, especially the lymphatic system. This matters because the lymphatic system can become the most acidic of all thanks to the barrage of chemicals, acids, plastics, pesticides, and pathogens constantly entering it. Leafy greens help drain the lymphatic system of these toxins. 

They hold vital mineral salts and trace amounts of bioavailable iodine, chromium, sulfur, magnesium, calcium, chromium, sulfur, manganese, and molybdenum, which are critical for neurotransmitter and neuron support. Leafy greens are high in enzymes too as well as vitamin A, B, healing alkaloids, and forms of chlorophyll and carotenes. This unique group of nutrients works together to feed all organs and body systems. Oh, and believe it or not: Leafy greens contain the most bioavailable and assimilable proteins you can find. So the next time you find yourself picking all the "good" stuff out of a salad and leaving the boring leaves, remember what you just read! Your body will thank you for eating your greens. 

A separate note on microgreens: what's the point? Well, take everything said above about grown-up greens and multiply it for these babies. They pack even more of a phytochemical punch than the veggies they'll become (hello broccoli greens) but require a fraction of the processing to assimilate their powers. Oh, and they're easy to grow at home so you can cut them and eat them immediately. 

Green onions: Any kind of onion (leeks, chives, scallions, red onions, shallots etc) is a natural antibacterial. To really benefit from onion's qualities, we need to eat them more often! Some people feel uncomfortable after eating onions but, contrary to popular belief, they are not irritants. An upset tummy from onions is an indication that you likely have an elevated level of unproductive bacteria in your gut. Onions work to eliminate that bacteria and the resulting die-off can result in temporary discomfort. Onions are one of the most accomplished foods on the planet for keeping down bacterial overgrowth in the body. Onions are also high in trace minerals zinc, manganese, iodine, and selenium so they can help rejuvenate the skin and protect your lungs (helpful for addressing colds and flus). They're also the ultimate anti-inflammatories for the bowels.  

Avocados: Avos have been called "the mother fruit" and "the soul of all other foods" because an avo is the closest food on the planet to breast milk. Maybe that's why babies love them when they're offered them as early solids? Avocado is at the top of my gut-boosting food list from ZOE. Why? It contains phytochemicals called isothiocaynates - they're responsible for the color of the yellow-green flesh and help restore stomach and intestinal linings. Avocados are amazing for your brain too! A healthy source of omega-6 fatty acids, they can help restore the central nervous system and ward off dementia. They also have an anti-aging effect on your skin, reducing dryness and contributing to the disappearance of dark under-eye circles.

Pepitas / pumpkin seeds: Just a handful of these seeds offers a concentrated source of protein and energy-producing magnesium, along with generous amounts of immunity-boosting zinc. Abundant in phytosterols, which help lower cholesterol, pumpkin seeds also provide lots of fiber when eaten in their shells. So next Halloween, keep all those seeds you scoop out and roast them with salt and garlic powder. 

So much for a "simple" salad eh?

So, what if you don't have the space to grow greens? Well, I live in an apartment with no deck or outdoor space. So I have a countertop Aerogarden. It was given to me as a Xmas gift a couple of years ago and I was skeptical. But I've now experimented a bit with the mix of things I like to have in there and I'm impressed by the kale and lettuce varieties. This winter I let thyme, sage and Thai basil go a little nuts but having them around felt therapeutic during Chicago's bleak grey days.  

A hydroponic garden this size does not produce fast enough to provide you with a full salad every day. But it can provide you with a few leaves to supplement your salads, and those leave were living just minutes before arriving in your tummy so they're powerful.   

What's the best way to eat salad?


I'm a huge fan of The Glucose Goddess and one of her key hacks for preventing big glucose spikes is "add a green starter to all your meals". Why? Because eating fiber before you eat anything else slows everything else down, especially glucose. 

Your green starter doesn't have to be salad, but salad is great because (a) it's SO nutritious and (b) adding a sprinkle of vinegar to a salad is a pretty normal way to use and eat vinegar. Why does this matter? Because ingesting vinegar before a meal will also help you keep your glucose spikes to a minimum. Why does this matter? That's for another day and another post. Last best thing to do? Use pink Himalayan salt instead of sea salt.

Why pink Himalayan salt? First, it's an ancient salt that's been compressed over millions of years and is believed to be one of the purest forms of salt for that reason. Second, unlike refined table salt that's been stripped of its mineral content, pink Himalayan salt contains all 84 essential trace elements required by your body.

So my point today is that there IS a best way to eat a salad: eat it first, dress it in vinegar, good olive oil and pink Himalayan salt, and appreciate what a service it's doing for your body. And then eat whatever else you like to feel full! A salad does not have to be the only thing you eat... just make it the first thing at one meal a day. As often as possible. 


Read more » →
Mains Recipes Vegan

Butternut and chickpea salad with tahini sauce

I love butternut, but my blood-sugar control isn't good so I have to be thoughtful about how I eat it. That's why I LOVE this salad. It's great warm or cold, and satisfyingly dense the way potato salad is. So think of this as a great alternative to potato salad that won't spike your glucose. 

Before we get into the recipe, here are some fun facts about butternut and sweet potato and why butternut is better. Screenshots are from the ZOE personalized nutrition app - learn more about ZOE here.
Both butternut and sweet potato by themselves spike my blood sugar. But look at the difference in glycemic index, sugar, and fiber. Butternut is the way to go for me, which is reflected in the higher Zoe score.
Another fun fact: there's ONE ingredient in this salad that magically flattens the blood glucose spike I'd otherwise get from butternut: 
TAHINI! The goal with ZOE is to eat meals that score 75+ and at least five different plants every day. Here's how this salad scores in ZOE: 

Let's get into the making of it. You're going to start by roasting butternut. I don't know why, but I find that when butternut is served in restaurants in the US, it's always undercooked. Roasted butternut pieces should have the same consistency as roasted sweet potato pieces: firm enough to keep their shape, but soft inside. 

Cover a large baking sheet with silicone cookie sheets or aluminum foil and pour a generous amount of olive oil onto the sheet. Scatter the butternut pieces across the sheet and get them evenly spaced.
Spray with olive oil and then sprinkle with the seasoning of your choice and dab small amounts of garlic on some of the pieces. 
Once the butternut is done, let it cool. Or, if you plan to serve the salad as a warm dish instead, make sure everything else is ready so that you can mix it all together as soon as the butternut comes out of the oven,
While the butternut cooks, prep the tahini sauce. If you haven't worked with tahini before, be prepared for a chemical event! When the tahini hits the lemon juice, it looks like an oil and water situation. 
You have a spoonful a thick beige paste sitting in lemon juice and it's not super appealing. But as they combine, they become a smooth, white liquid easily diluted further by adding water (and olive oil to taste). 


Here's the tahini and lemon chemistry in motion! 
And the lovely final product.
Next, prep the red onion and cilantro. I love these flavors and tend to go heavy on the cilantro. If you aren't a fan, try using parsley instead or just leave this out. 
To assemble the salad, combine the squash, chickpeas, onion, and cilantro in a mixing bowl. Add the tahini sauce and toss carefully. Alternatively, you can serve the salad undressed with the sauce on the side so that each person can use as much or as little as they like.  
This salad, lightly dressed, keeps beautifully in the fridge. Before serving, give it a little jolt in the microwave to take the chill off and make sure you have extra tahini sauce.  
It's a meal on its own but I generally don't eat it that way. Like I've said, it's dense and satisfying the way potato salad is, so I generally eat it as a side along with a green salad and/or fish, with lots of extra tahini sauce on it!

HOW TO MAKE BUTTERNUT AND CHICKPEA SALAD

SERVINGS: 4

INGREDIENTS

For the salad:

  • 1 medium butternut squash (about 2 to 2 1/2 lbs), peeled, seeded and cut into 1 1/2 inch pieces
  • 1 medium garlic clove, pressed  
  • 1/2 tsp of ground allspice (or whatever spices you like on roasted butternut)
  • 2 Tbsp olive oil
  • Salt
  • 1 15-ounce can of chickpeas, drained and rinsed
  • 1/4 of a medium red onion, finely chopped
  • 1/4 cup of coarsely chopped cilantro leaves

For the tahini sauce:

  • 1 medium garlic clove, finely minced with a pinch of salt
  • 3 1/2  Tbsp of lemon juice
  • 3 Tbsp of well-stirred tahini
  • 2 Tbsp of water
  • 2 Tbsp of olive oil (or more, to taste)

INSTRUCTIONS


- Preheat the oven to 425 degrees F (about 220 C)
- Cover a large baking sheet with silicone cookie sheets or aluminum foil and pour a generous amount of olive oil onto the sheet. Scatter the butternut pieces across the sheet and get them evenly spaced. Spray with olive oil and then sprinkle with the seasoning of your choice and dab small amounts of garlic on some of the pieces. 
- You can also toss everything in a bowl together before you scatter it all onto the baking sheet. Bake for 20-25 mins or until soft. Butternut should be treated just like sweet potato - it should be firm-ish but still soft in the middle, otherwise it's undercooked. Remove from the oven and cool.
- To make tahini sauce: in a small jug or bowl, whisk together the garlic and lemon juice. Add the tahini and whisk to blend (it'll go from gloppy beige to smooth white). Add the water and olive oil and keep whisking. Add seasoning to taste. The sauce should have plenty of tahini flavor but also a kick of lemon. If it's too bitter or the lemon is too strong, add olive oil. 
- To assemble the salad, combine the squash, chickpeas, onion, and cilantro in a mixing bowl. Add the tahini sauce and toss carefully. Alternatively, you can serve the salad undressed with the sauce on the side so that each person can use as much or as little as they like. 
- NOTE: This salad, lightly dressed, keeps beautifully in the fridge. Before serving, give it a little jolt in the microwave to take the chill off and make sure you have extra tahini sauce.  


Read more » →
Breads & Muffins Recipes Vegan

Nutty seed bread (grain free)


I have poor blood-sugar control so I was not surprised to see that almost all grains score very low for me in the ZOE app. This means that in anything other than very small quantities, they cause big glucose spikes, which we all need to avoid really. A lot of grains (especially highly processed and refined versions) also suppress the growth of the good bugs that we need for a healthy gut microbiome. 
I've lived pretty-much grain free for a long time now because they just make me feel bad, so I've done my share of experimenting with grain-free bread recipes. This recipe is my winner and ZOE agrees (see the score of 98 below). It's packed full of almond and coconut flour, and lots of seeds (including pumpkin, flax, sesame, and chia). It's not a "light" bread, so it's really satisfying. It freezes and toasts beautifully, and thanks to the sesame seeds, it smells heavenly when it's baking and if it smells like bread... well, it's bread! Oh, and it's gluten-free, vegan, and keto approved if those things matter to you. 


So let's get to the making of it!


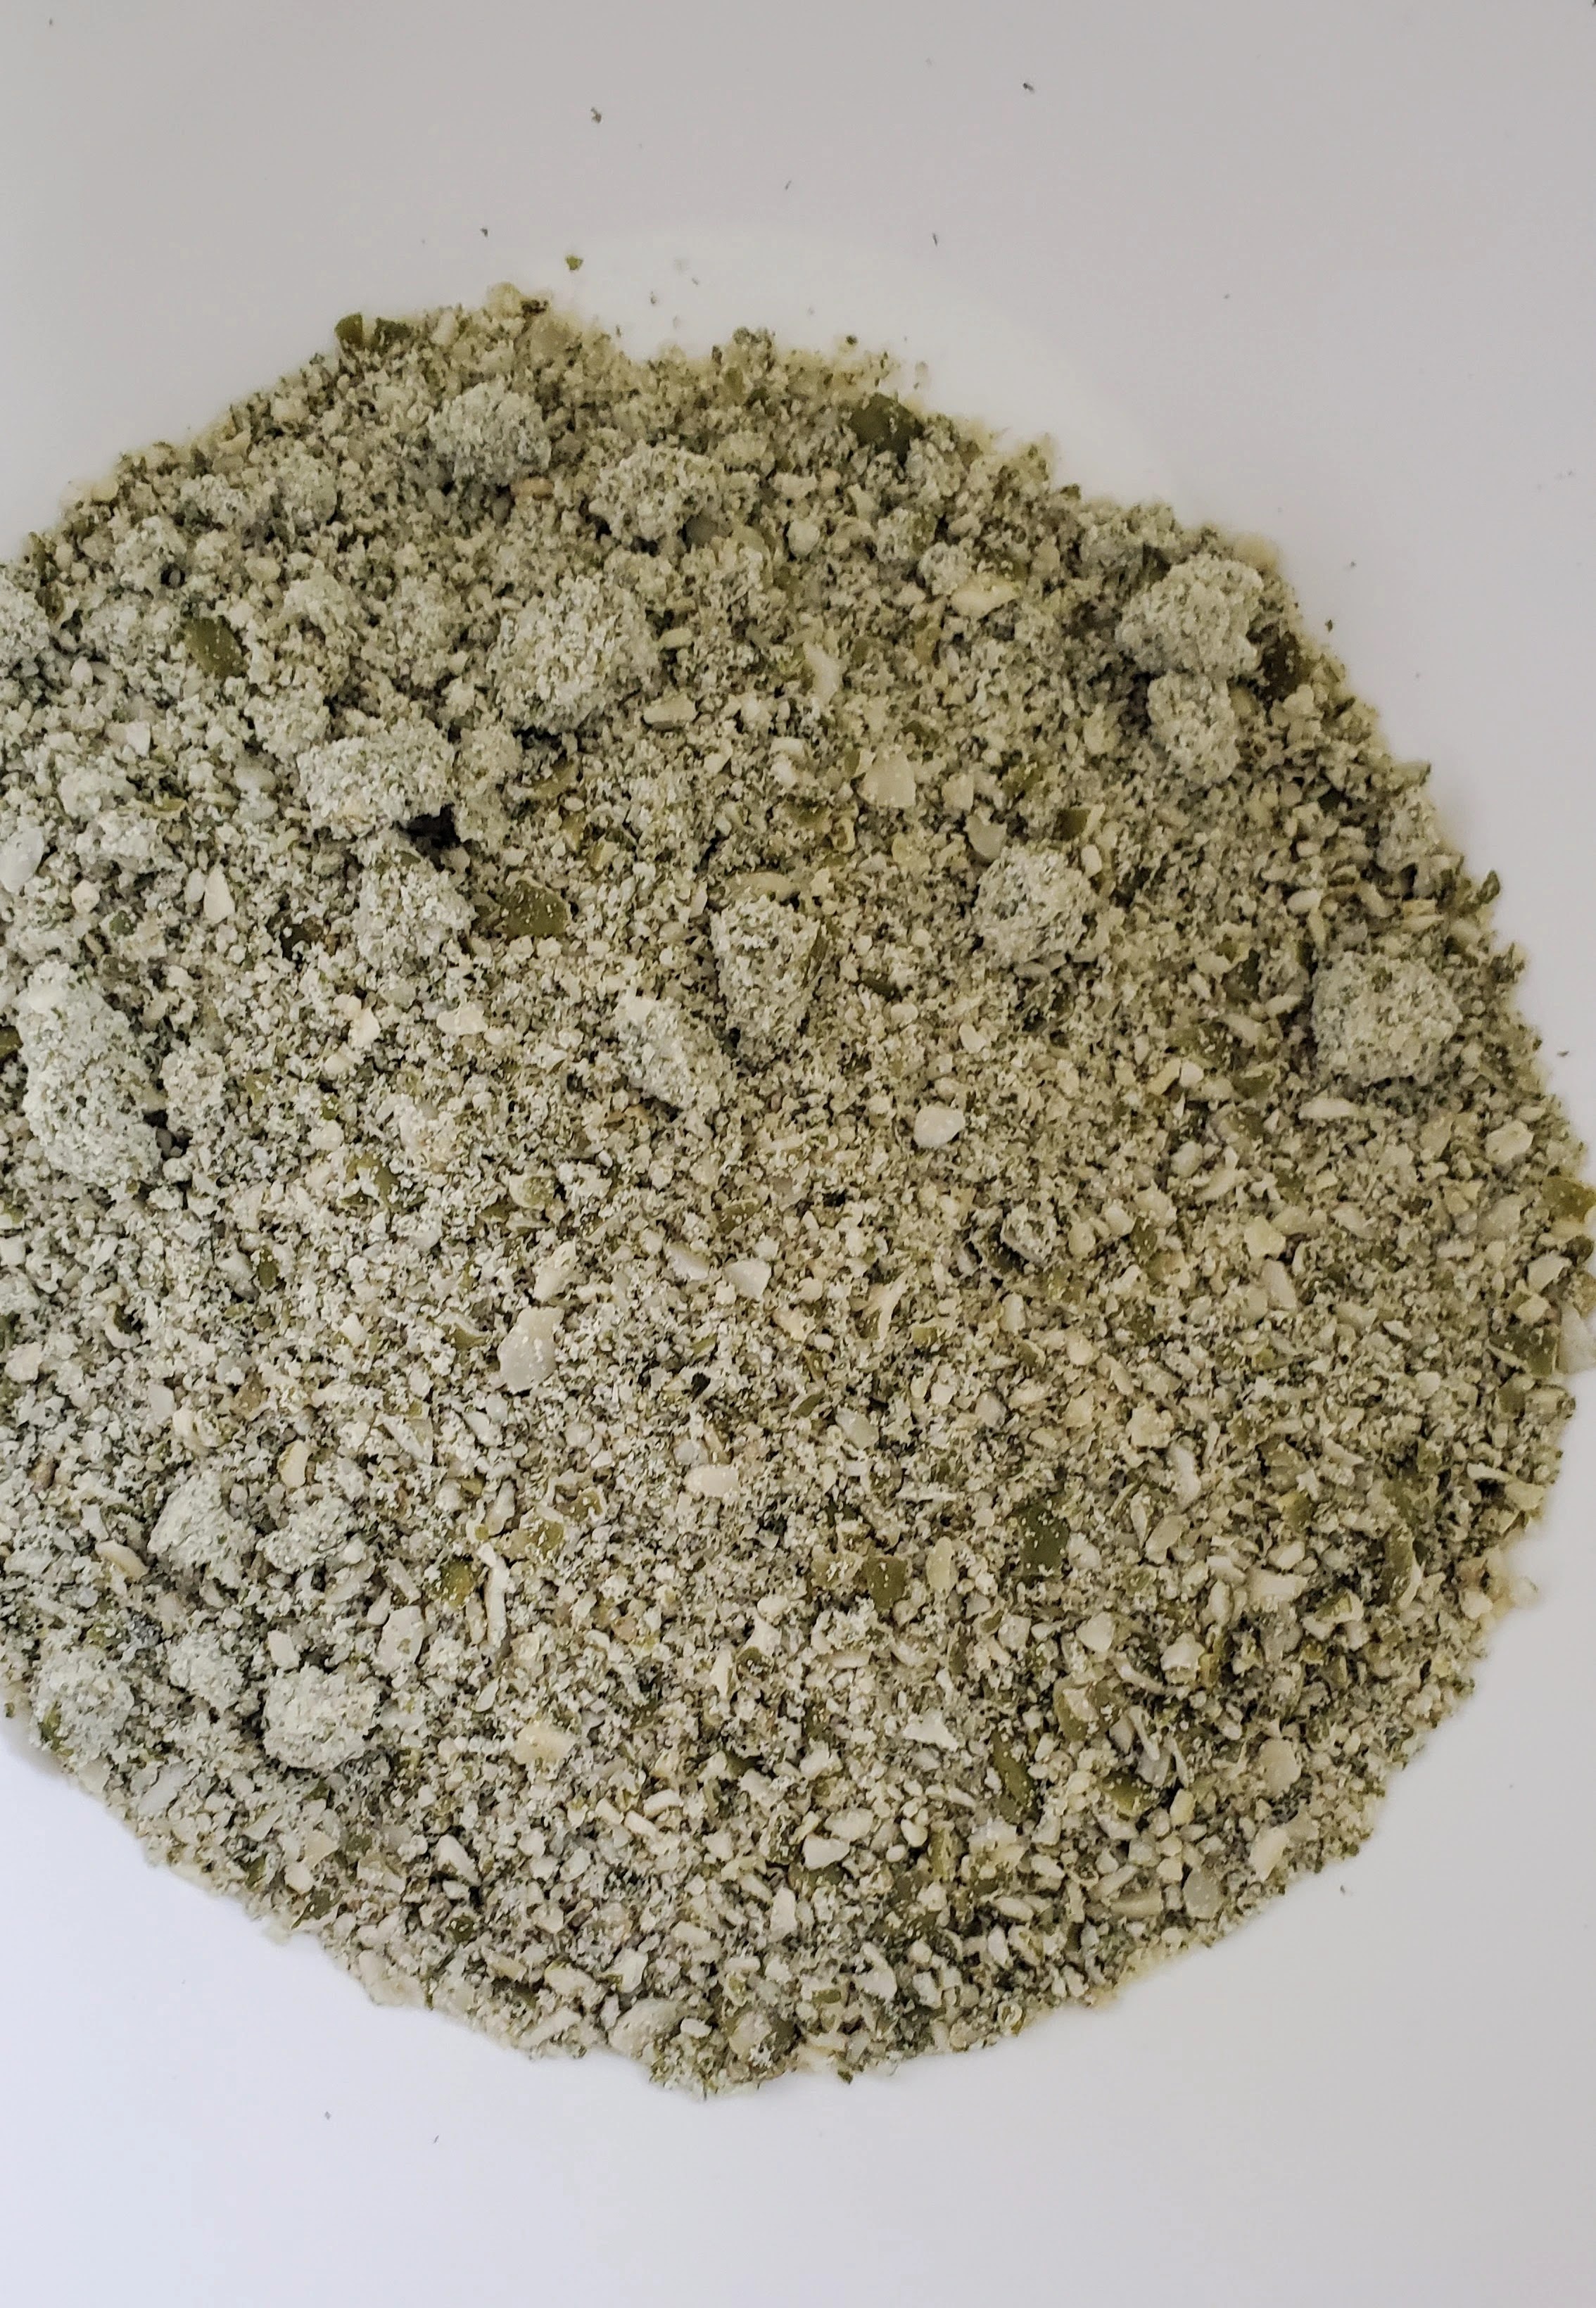
Step 1: Grind up your shelled pumpkin seeds into a course meal. I'm showing you a picture of what I use because to get a course meal, you need to be using shelled seeds, usually called "pepitas" in the US. They are nutritional superheroes so it's worth the step of getting them into this bread: they're rich in protein, fibre, magnesium, potassium, zinc, and iron. And studies show that they may support blood-sugar balance, improve cholesterol levels in postmenopausal women, help regulate blood pressure, and benefit bladder health.  
This is what a cup of ground pepitas should look like. You want some course bits in there because they add to the bite of the bread. 
A note on psyllium husk: many recipes for this kind of bread depend on a LOT of psyllium, which can result in a lot of time on the loo for some people. For others, like me, it simply creates enough tummy discomfort that I don't love it. For this recipe, you'll see that I advise you to play with ratios of ground flax to psyllium. They both serve the purpose of quickly absorbing the warm water and binding the bread dough. So you're aiming for 1/3 of a cup of psyllium and flax combined. I bet using only ground flax would work just fine too. 
All the ingredients together are really pretty! And yes, that's pink Himalayan rock salt in there because it's another one of those small but mighty changes we can all make to our diets. In this case, we're exchanging the micro-plastics now found too often in commercial sea salt for the thousands of beneficial minerals found in rock and desert salt. 
Once you've added the liquid ingredients, it'll look loose like this. Just give it a couple of mins and then go in with your hands. 
The warm water quickly activates the flours (and flax and psyllium) and you should be able to gently pull the dough into a ball like this. It does NOT NEED TO BE KNEADED.
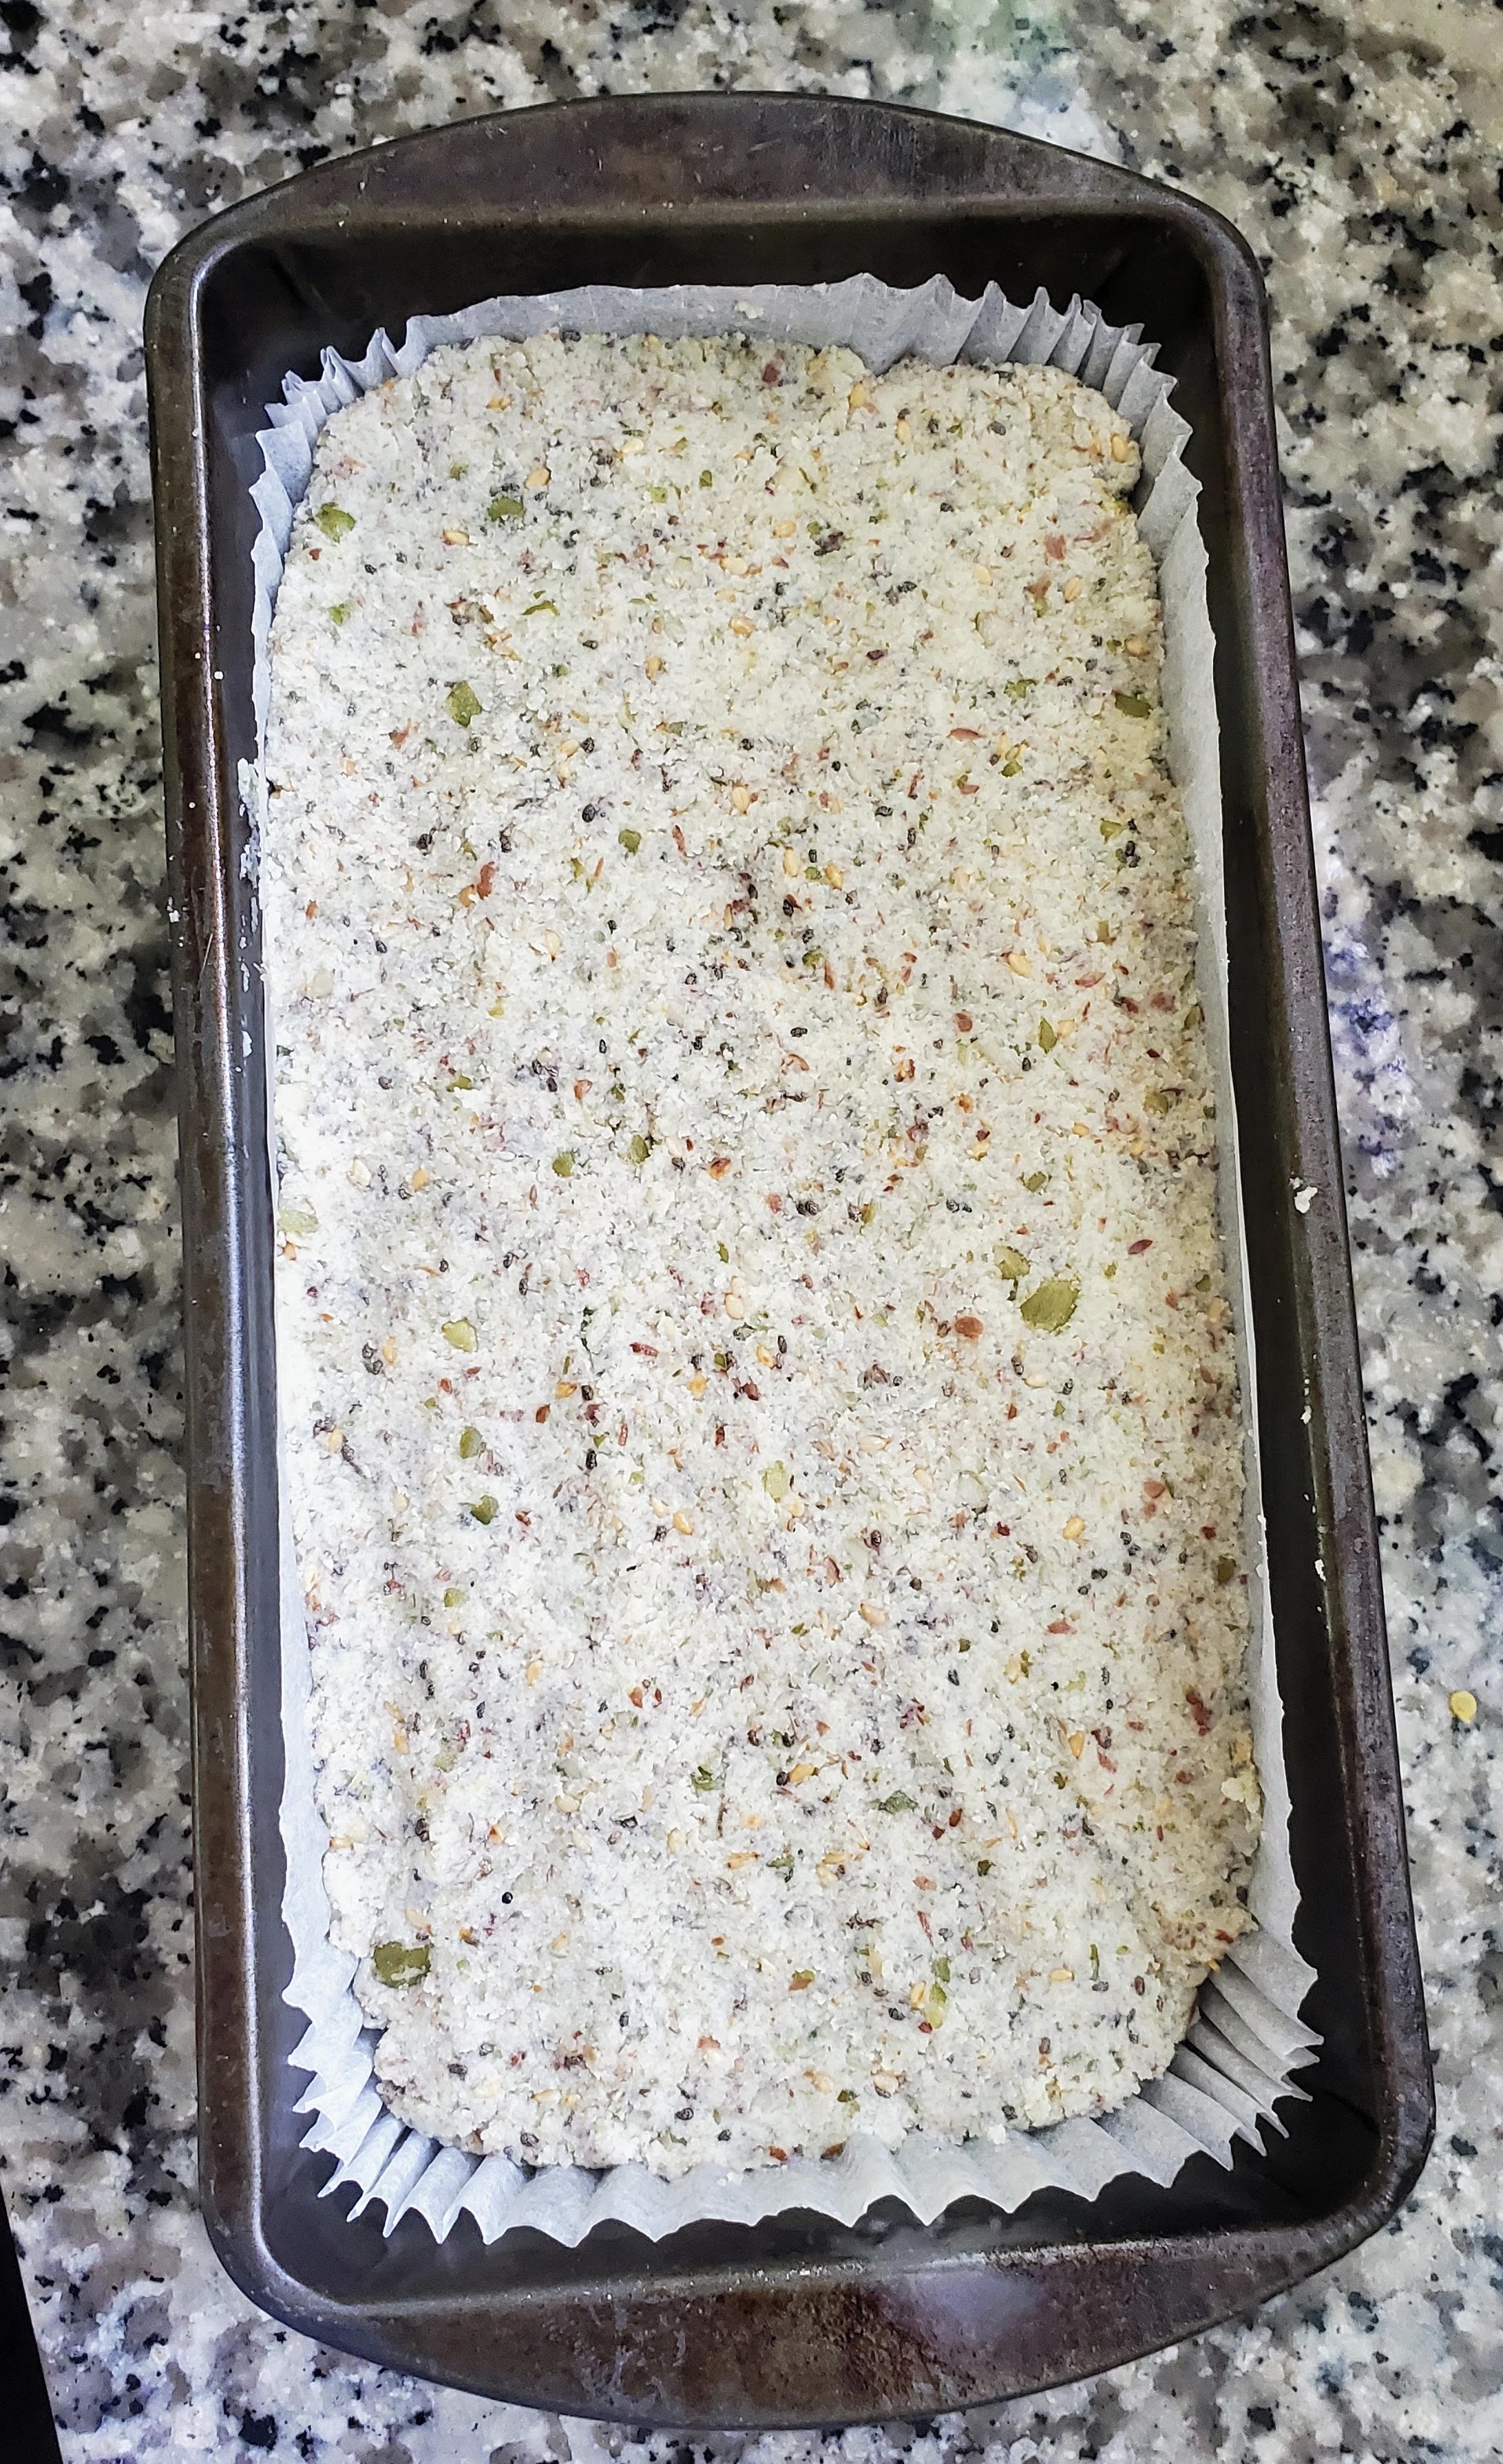
Then you pop it into a paper-lined pan and decide how to shape it. If you want a loaf that's rounded, then form that shape in the bowl before popping it into the pan. I like to spread it out in the pan and so I end up with slices that are even and rectangular (easier to store in the freezer). 
After approx. 50 mins, your loaf will be golden like this. And yes, I'm lazy and buy loaf-tin liners versus measuring out pieces of parchment paper every time.
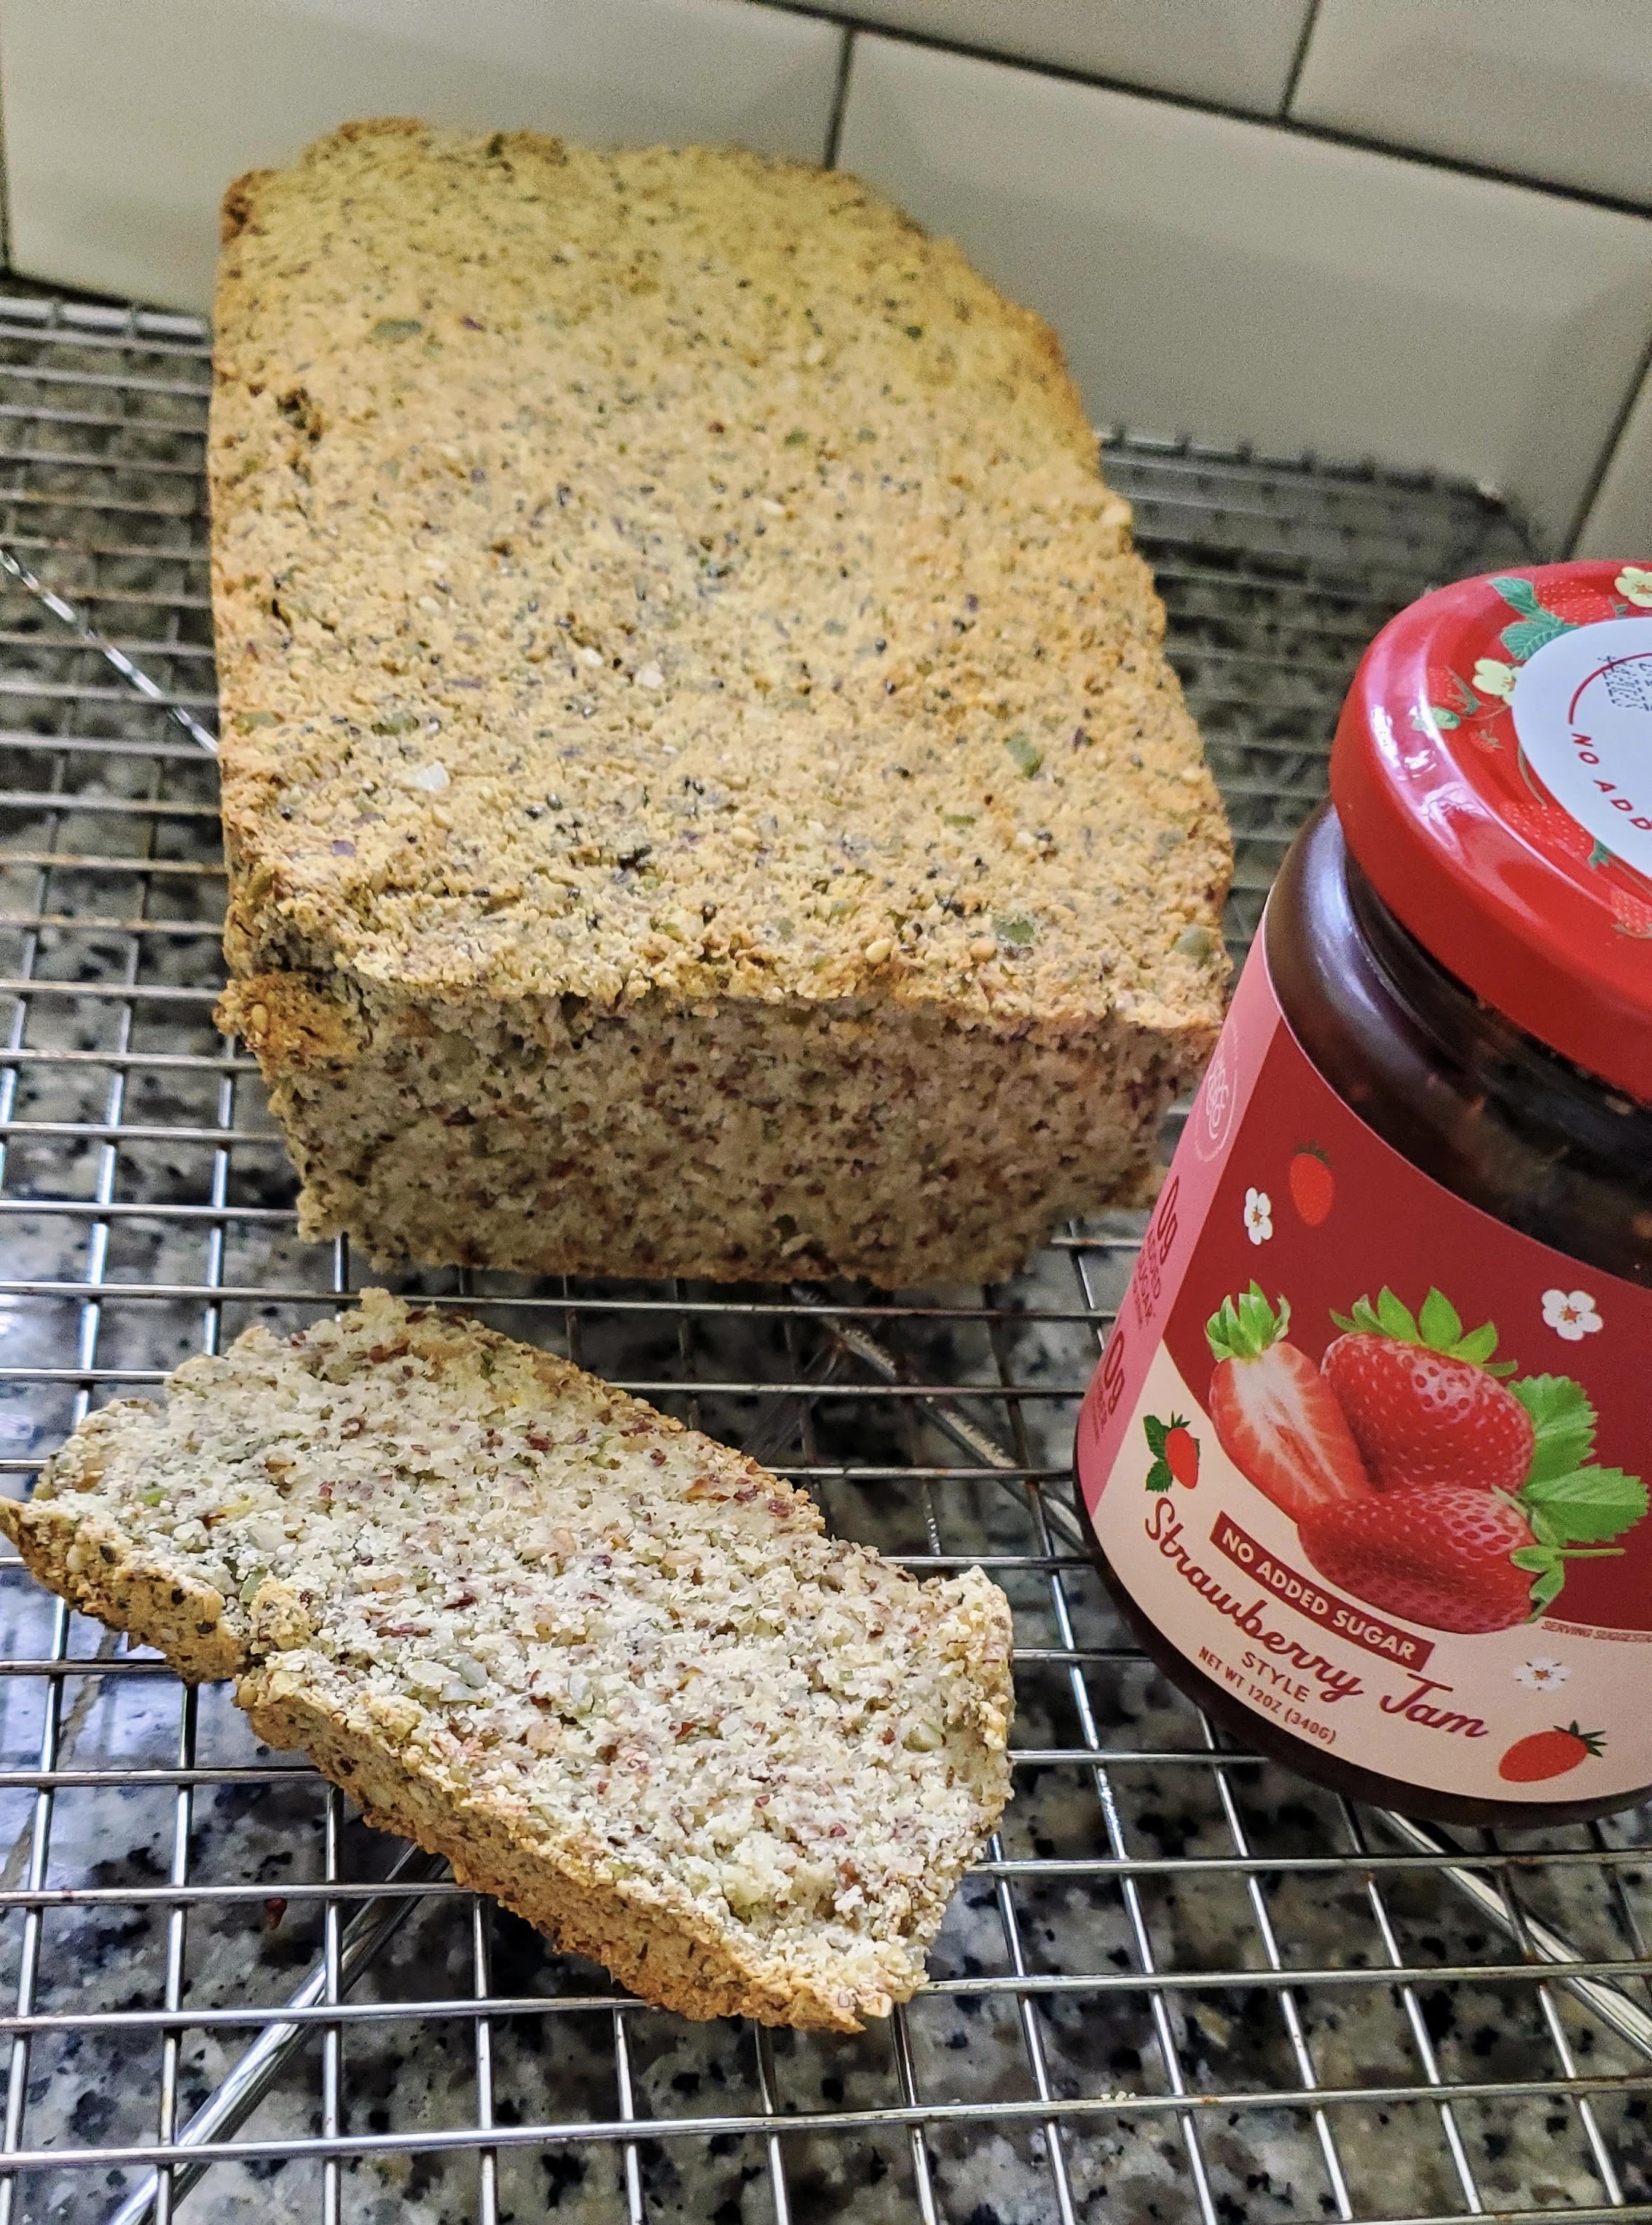
You need to let the loaf rest for a few hours before you cut it. But if you can't resist lopping off an end slice to eat hot, I won't tell anyone.
Finally, here's my storage tip: I'm the only one eating this bread and I need it to last. So once it's cool, I slice it up and lay the pieces out on a cutting board. Then I freeze them like this. Once they're frozen, I pack them all into a container or bag and it stores easily in the freezer for weeks. I pop a frozen slice straight into the toaster on it's maximum setting (7 mins) and that's usually enough to get it from frozen to toasted. 

How to eat this?? Any way you like! But I love to use it for Avocado Toast because it works beautifully with creamy avo. It's also delicious with almond butter and/or Choc Zero raspberry or strawberry jam. 

HOW TO MAKE NUTTY SEED BREAD


PREP TIME: 15 mins
COOK TIME: 50 mins
SERVINGS: about 16 slices

INGREDIENTS

  • 1 cup of almond flour
  • 1 cup of lightly ground pumpkin seeds (must be shelled seeds - see above for how to make this)
  • 1/2 cup of coconut flour
  • 1/3 cup mix of psyllium husk and ground flax (depending on your tolerance for psyllium)
  • 1/4 cup of chia seeds
  • 2 tablespoons of sesame seeds
  • 1 teaspoon baking powder
  • 1 teaspoon salt
  • 2 tablespoons of grape seed oil (or olive or almond)
  • 1 teaspoon of apple cider vinegar or lemon juice
  • 2 cups of warm water (40C/105F) - think hot bath temp which is what comes out of most hot-water taps 

STEP BY STEP


- Preheat the oven to 400F/200C and line a 9x5 inch loaf pan with parchment paper. Lightly oil the paper and set aside.

- Combine all the dry ingredients in a large mixing bowl - you may need to work some lumps out of the almond flour. 

- Stir in the liquid ingredients, making sure the water is warm otherwise the flours won't activate as well or as fast. 

- Stir with a spatula or a fork first until the ingredients are well combined and let it sit for just a couple of mins. Then you should be able to use your hands to pull the dough into a ball (see the pictures above). It it's too sticky to do this, give it another few minutes and the consider sprinkling in a little more ground flax. 

- Once you're able to form the dough into a clean-ish ball (or cylinder) you can drop it into the lined loaf tin. Whatever shape it has going into the oven is the shape it will keep - it doesn't rise or expand. So you decide what works for you. I generally flatten is down so I end up with pretty even rectangular slices. It doesn't look as pretty, but it's practical! 
- Bake for 50 minutes then insert a skewer in the middle of the bread. If it doesn't come out clean, bake for another 10 mins then check again. And if it looks like it might burn on top during these extra mins, pop a piece of foil over the top.
- Cool on a rack for at least a couple of hours before slicing, although if you slice off one end to eat warm, I won't tell anyone. 
- Store for up to a week in a pantry, wrapped in a kitchen towel. Or slice the whole loaf and freeze the slices so they're ready to toast (see the picture in the blog post). The max time on my toaster is 7 mins and that's what it takes to defrost the slice and also toast it a little. 

Adapted from a recipe by Sweet as Honey 


Read more » →
OLDER →
Subscribe to: Posts (Atom)
WELCOME! I'M

Candice

WELCOME! I'M
Aging is inevitable.
Feeling old and unwell is not.

GET TO KNOW ME →

Social with me

What's popping

  • No-sugar blueberry muffins
  • Glucose spikes and why we need to avoid them
  • Sardine salad: how to love these little fishies
  • How to eat pasta when your blood glucose control is poor
  • Carrot, tomato, chickpea, and feta bake

BROWSE THE ARCHIVES ↓

  • July 2023 (3)
  • June 2023 (2)
  • May 2023 (6)

Subscribe to Hello Healthspan

  • Privacy Policy
  • Medical disclaimer
© Hello Healthspan • Design by MG Studio
TOP ↑